SleeveShirts · Practical guide
Hiking Clothing Guide: Shirts, Layers, Pack Fit & Weather
Choose hiking shirts and layers for the route, weather and pack you actually use, with a visual layering guide, fabric trade-offs and practical outfit checks.
SleeveShirts Editorial Review · Updated · 12 min read
Based on the official guidance and manufacturer specifications linked below. Recommendations and try-on checks are editorial judgments, not hands-on or laboratory test results. We may earn a commission from qualifying Amazon purchases.
The practical answer
Choose a comfortable next-to-skin shirt, carry insulation and weather protection appropriate to the trip, and test everything with your loaded pack. Layering describes different jobs, not a rule to wear three layers at once. Verify sun protection on the exact garment and plan for changing conditions rather than buying around one fabric weight or brand.
Which trip are you preparing for?
Start with a comfortable shirt and stable sun coverage; carry what the route and forecast require.
- Check hem and sleeves with your pack loaded.
- Assess ventilation where straps will cover the fabric.
- Plan for a stop or change in weather, not only the warm uphill section.
Editorial decision aid. It does not calculate safe exposure time, heat tolerance or a product performance score.
Give each layer a job
| Layer | Main question | Fit check | Common mistake |
|---|---|---|---|
| Base / hiking shirt | Is it comfortable next to skin during movement? | Reach while wearing the pack | Buying by fiber name alone |
| Midlayer | What warmth is needed during stops or colder conditions? | Check space under the shell | Wearing every layer for the entire climb |
| Shell | What wind and rain performance does the trip require? | Zip over the planned outfit and turn your head | Treating a water-repellent finish as waterproofing |
| Sun accessories | Which skin remains exposed? | Check hood, hat, cuffs and sleeves together | Assuming shade from a cap covers everything |
See what to check
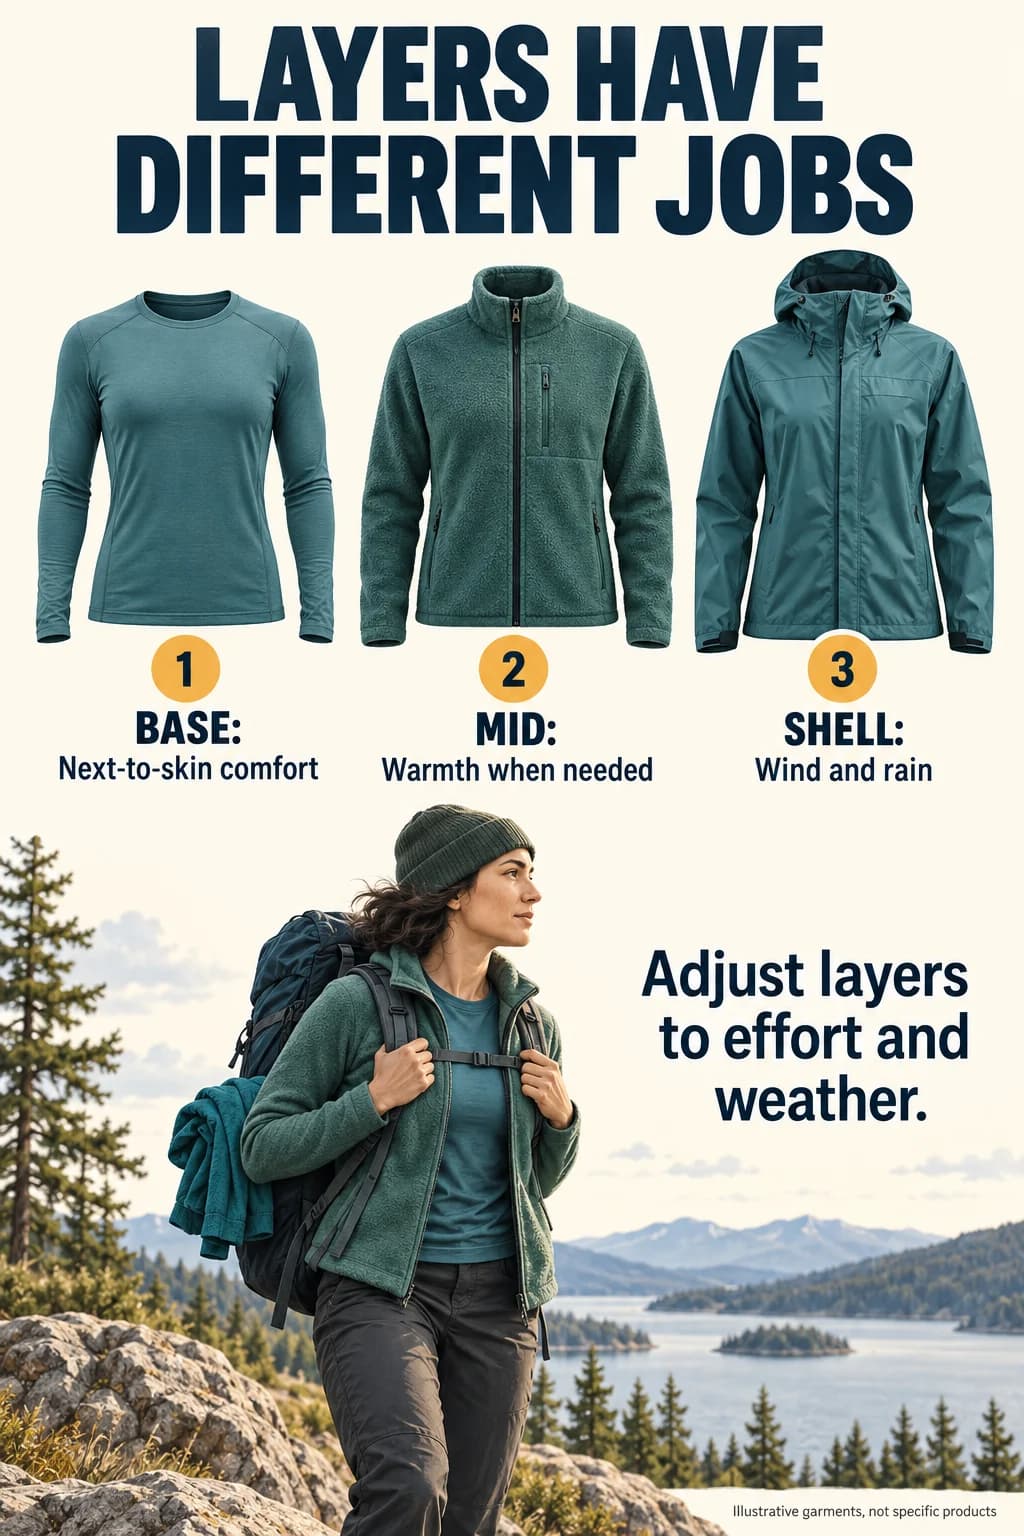
- Choose the base layer for comfortable movement against your skin.
- Add a midlayer when the conditions and activity require warmth.
- Choose a shell for the weather protection the trip needs.
- Carry and adjust layers; the diagram does not mean wearing all three in hot weather.
When cotton is a poor hiking choice
The practical concern is remaining wet and becoming cold, not a dramatic slogan. National Park Service guidance for wet or cold environments recommends avoiding cotton and preparing with suitable layers. Apply that advice to the trip you are taking: expected weather, remoteness, how long you might stop and whether you can change into dry clothing.
Avoid universal numerical claims about how much water every cotton shirt absorbs or a fixed temperature at which it becomes dangerous. Construction, garment weight and conditions differ. A familiar short walk with immediate shelter is not the same clothing problem as a remote route with cold rain. Plan for the consequences of getting wet rather than treating a fiber label as a complete risk assessment.
Sources: NPS Denali: Discovery hikes · NPS Yellowstone: Winter safety
Understand the three roles before buying three items
A base layer sits against the skin, a midlayer provides warmth when needed, and a shell addresses wind or rain according to its specification. An item can serve more than one role, but the functions remain useful for planning. You do not need to wear all layers continuously, and a warm-weather shirt is not automatically a complete mountain system.
Try layers together. A comfortable fleece can feel restrictive under a narrow shell; a long base hem can bunch beneath a hip belt. Check how sleeves stack at the wrist and whether two hoods interfere. The outfit should allow the movements required on your route, including reaching upward and turning your head.
Think about access as well as fit. A layer buried at the bottom of a full pack is less convenient when conditions change. Protect reserve clothing from water in a way suited to the trip. Adjust your outfit thoughtfully rather than waiting until one layer is saturated or an exposed stop feels uncomfortable.
Explore the layer-planning tool →Compare the finished shirt's construction and fit
Fiber names are a starting point. The knit or weave, blend, fabric weight, finishes and cut can change the behavior of the finished top. Do not assign every nylon shirt superior abrasion resistance or every merino shirt the same odor performance. Look for the exact material information and identify what remains untested.
For a sweaty climb, consider how the shirt feels under shoulder straps and whether openings can be adjusted comfortably. For a multi-day trip, ask how you will wash, dry and rotate clothing. For sensitive skin, examine seams and surface feel rather than choosing only from a specification sheet.
If a product page provides a drying or odor-control claim, keep the attribution clear. Without comparable test methods, it is not evidence that one shirt dries twice as fast or remains fresh for a stated number of days. Your buying decision can still be useful: choose the design that fits your pack, care routine and coverage needs.
Read the merino-versus-synthetic comparison →Separate sun coverage from warmth
A cool breeze does not tell you the UV level. Use current UV information and the protection guidance relevant to your destination. Choose a stated garment rating if you need one, then account for exposed skin. A hoodie or long sleeve only helps where it stays in place.
The CDC recommends combining protective clothing with shade, a hat, sunglasses and sunscreen on exposed areas. Check your face, neck and hands as well as your torso. Do not compare hiking routes to a universal tropical-beach exposure or invent a percentage of hikers who underestimate UV.
A rating describes a tested textile property, while your outfit adds design and movement. Read the exact model and color claim. If a shirt becomes wet, stretched or worn, do not assume its protection remains identical. The detailed UPF comparison explains the numbers without turning them into a countdown of safe time outdoors.
Sources: CDC: Sun safety
Understand UPF 30 and 50 →Weight and abrasion need separate evidence
A low weight is attractive when you carry everything, but a quoted number needs context. Is it the complete garment or the fabric's GSM? Which size was weighed? Does the shirt include a hood, zip or pockets? Do not compare unlike measurements as though they describe one identical construction.
Look at contact zones: shoulder straps, hip belt, elbows and any brush against vegetation. Examine the weave or knit, seam positions and care instructions. If the maker does not publish an abrasion test, say that evidence is missing rather than assigning a durability score from the fiber or price.
After outings, inspect the places where your equipment rubs. A small stitching repair and a broad area of thin fabric are different issues. You can observe wear without pretending to measure residual strength or UPF. Use the change in condition to decide whether to seek manufacturer advice or replace the garment.
Compare fabric-weight claims →Three outfit examples to adapt to your route
For a warm forest day hike, start with a comfortable shirt that works beneath your pack and the lower-body clothing and footwear suited to the route. Carry weather and stop layers as the forecast and remoteness require. Before buying another top, check whether changing a strap adjustment or seam position solves your current discomfort.
For an exposed route with wind and variable conditions, prioritize stable coverage and a layering combination you can adjust. Check that the shell closes over the intended layers, and turn your head with the hood up. A sun hood is not a rain hood; confirm which function each piece supplies.
For a multi-day trip, plan a realistic clothing rotation. What stays dry for stops or camp? What can you wash and dry under the conditions you expect? A very light shirt that is awkward to care for may be less useful than a slightly different design. These examples are packing prompts, not complete route-safety plans.
Sources: NPS: Hike Smart
Build a practical packing system →Use a loaded-pack fitting routine
Put on the underlayers you expect to wear, then load the pack approximately as you will carry it. Fasten the straps and hip belt in their usual positions. Reach for a bottle, lift your arms and lean forward. Watch for a hem lifting out, sleeves retreating, or fabric gathering beneath the belt.
Check the neck and shoulders with your pack on. Seams can sit beneath straps, and a hood can pull at the collar when the back panel is restricted. Turn your head and look upward, including with any hat you normally wear.
Repeat the movements with a midlayer and shell if those will be used together. Do not size up every layer automatically: you may create extra folds while failing to solve a narrow shoulder or short sleeve. A different cut may be the cleaner solution. Follow return conditions and avoid taking unsuitable kit on a demanding trip just to justify keeping it.
Use model examples without declaring a brand winner
An outdoor brand can offer a light active layer, a heavier sun hoodie and several rain shells. Those products cannot share one reliable ranking for cooling, durability or fit. Compare the current style and its intended role, then check your size and requirements.
The Echo example below is useful because its listed rating differs by color and is lower than UPF 50. That trade-off should remain visible rather than disappearing into a generic recommendation for maximum sun protection. Use the specialist comparison for additional options and confirm each model before purchasing.
A good shortlist is short enough to try deliberately. Choose two or three designs that solve the same problem, record sleeve and torso fit, and compare them with your actual pack. Reject a shirt that fails the essentials even if the brand has a strong reputation.
Compare three sun-hoodie designs →Read environmental and finish claims precisely
Recycled content, a chemical-management program and a water-repellent treatment describe different attributes. A recycled percentage does not establish a lower impact in every category, and a finish claim does not tell you the complete garment's rain performance. Read the scope of the claim rather than treating a logo as a universal guarantee.
Ask whether the statement applies to the fabric, a component or the whole item. If the product page is unclear, contact the manufacturer or choose an option with clearer documentation. You do not need an invented forecast about the next season's textiles to make a sound purchase now.
Understand material and sourcing claims →Make care part of the buying decision
Choose an item whose washing and drying instructions you can follow both at home and on the intended trip. Read restrictions on heat, bleach and softener, and separate shell-care requirements from those of your hiking shirt. One generic wash recipe does not fit every finish or laminate.
After use, check seams, cuffs and pack-contact areas. Let the condition guide your questions; there is no universal wash count at which every garment becomes unprotective. A visual inspection can identify damage but cannot certify remaining UPF. Keep the original label or product details so you can ask a precise question if a problem develops.
Read the UPF care guide →A better upgrade plan than chasing new releases
Use a small trip log to note what worked: the route conditions, layers worn, pack used and any pressure or rubbing. When a problem repeats, buy for that problem. If the shirt fits well but you lack a suitable weather layer, another sun hoodie is unlikely to be the most useful upgrade.
Check that new clothing works with your existing gear and laundry routine. Keep using a garment while its condition and performance remain suitable.
One route, three clothing decisions
Planning example: start on a cool shaded trail in your comfortable shirt and a removable warm layer. As effort and temperature rise, remove the extra layer before it becomes soaked and use shade or a slower pace as needed. Keep suitable rain protection accessible for a shower.
During a windy stop, use the dry layer or insulation you packed; do not assume that a damp wicking shirt provides enough warmth. Check the forecast, route exposure and how far you are from shelter. The example is a packing decision, not a universal GSM prescription.
Concrete options and their limits
Use these examples to identify a suitable construction or cut. They are not ranked winners. Match the exact model and label; sizes, colors and availability can change.
Outdoor Research Echo Hoodie — 287625
Evidence: The manufacturer lists thumbholes, recycled polyester and UPF 15 light / 20 dark colors.
Consider it when: You want to assess a light hooded base layer with your pack.
Check the limitation: No UPF 50 rating or published pack-abrasion result is established here.
Layered outfit rather than one all-purpose shirt
Evidence: NPS guidance recommends clothing appropriate to the route and weather; cold or wet conditions require particular preparation.
Consider it when: Your trip includes changing weather or extended stops.
Check the limitation: This is a category recommendation. Verify each shell and insulating layer's specific function and fit.
Before you buy or head outside
- Check route-specific guidance and forecast.
- Identify which garment supplies comfort, warmth and weather protection.
- Try the whole system with a loaded pack.
- Verify the exact UPF claim and coverage gaps.
- Check care requirements, repair options and return conditions.
- Plan accessible reserve layers rather than wearing everything at once.
Frequently asked questions
Must I wear three layers on every hike?
No. The three roles help you plan. Wear and carry the combination suited to your activity and conditions; a warm uphill stretch and a cold stop may require different choices.
Is all cotton unsafe?
Avoid a universal rule detached from the outing. NPS cold and wet-weather guidance advises against cotton because it can remain wet and provide poor insulation in those conditions. Consider the actual route, weather and consequences of getting wet.
Is 130gsm the ideal hiking weight?
Compare GSM with construction, fit, the documented UPF and intended use. No single weight establishes comfort, protection or durability.
Can a sun hoodie replace a rain shell?
Not unless the exact garment also has appropriate documented weather protection. A hood and a quick-dry description do not establish waterproofing.
Should I buy a size larger for a backpack?
Not automatically. Try the garment with the pack and normal layers. Identify whether the problem is shoulder width, sleeve length, torso length or seam placement; changing the cut may work better than sizing up.
Sources checked
Reviewed September 18, 2026. Official guidance supports the safety and labeling explanations; manufacturer pages support only the specifications attributed to them.
- NPS Denali: Discovery hikes — Wet-condition clothing advice.
- NPS Yellowstone: Winter safety — Cold-weather layers and cotton limitations.
- CDC: Sun safety — Combined sun-protection measures.
- NPS: Hike Smart — Route, weather and preparation.
- Outdoor Research: Echo Hoodie — Current model features and color-specific rating.